Installation and Running App


This template built on top of Material UI
  • Connect to the internet
  • Install NodeJs from NodeJs Official Page
  • Unzip the file to a folder in your computer
  • Open Terminal
  • Go to your file project (where you've unzipped the item)
  • Install Modules
    Install module dependencies by run this script in terminal
    npm install
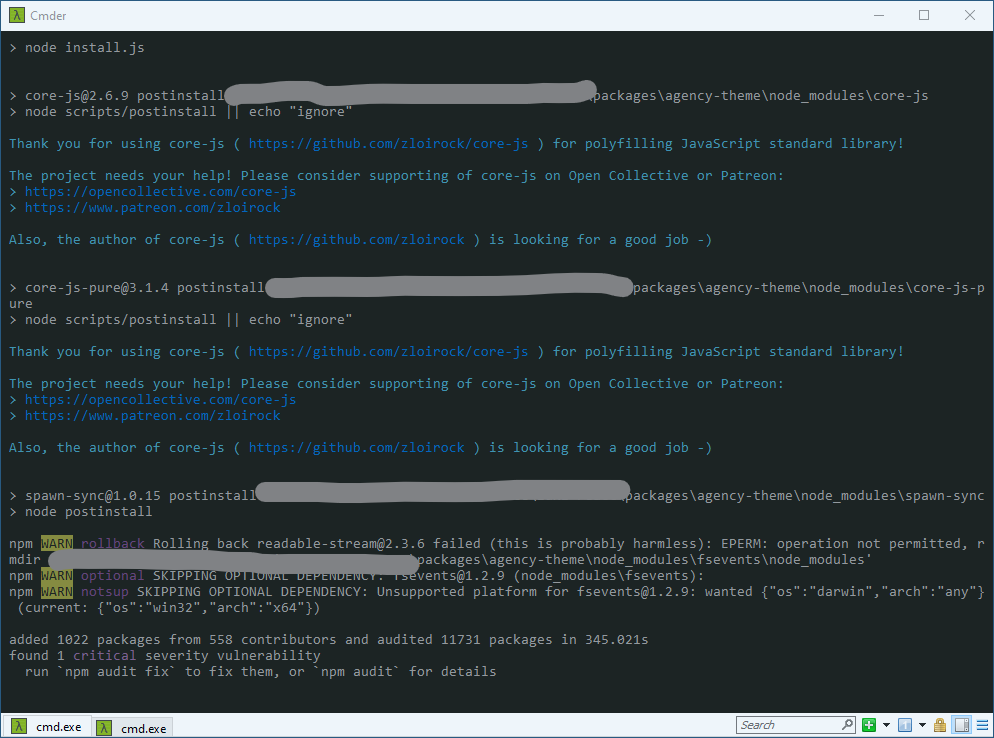
    It will download some necessary dependencies, and just wait until finish.
    process
  • Run App
    After build installation complete, then run the app.
    npm run dev
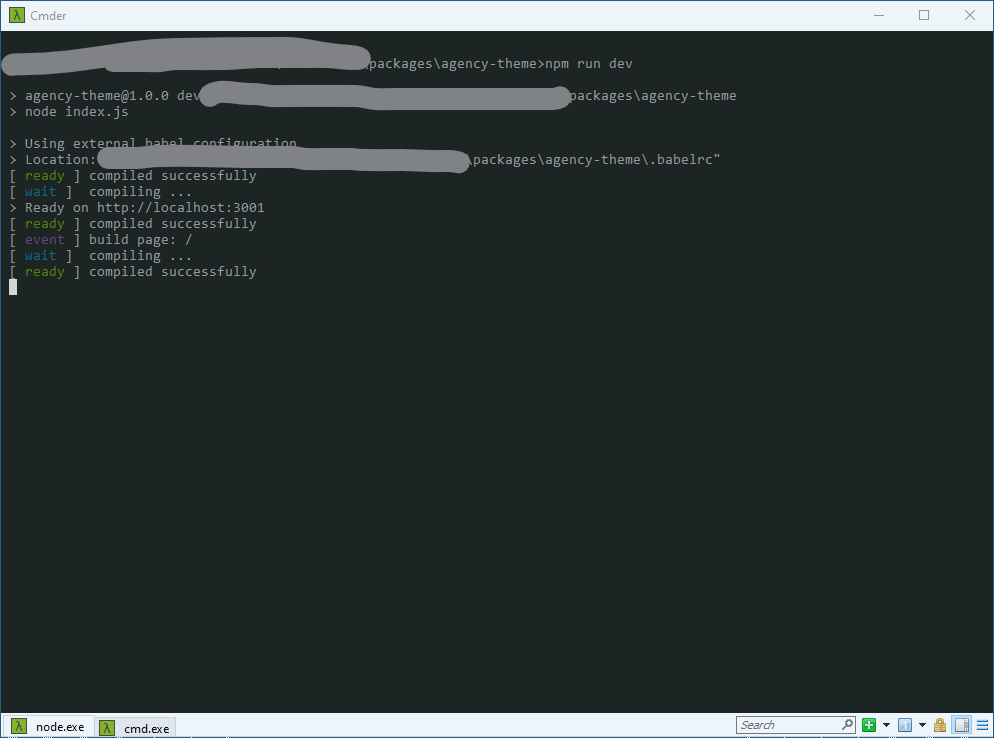
    The process might take a moment.
    process
    INFO:
    - Just run this script whenever you want start the project.
    - Run npm install again if you have new module dependencies,
  • After finish you'll see generated url with port in console localhost:300x. And Finally please navigate to that url in browser

Build App


Build project

  • First you need to build the production assets first
    npm run build
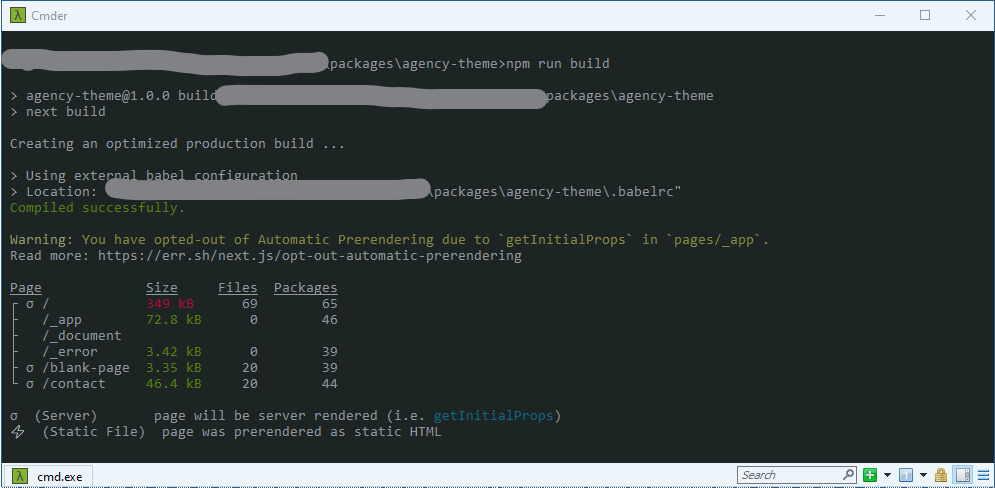
    It usually take longer time than development to generate and compress production code. The generated files will be placed in .next/ process
  • Then start the app
    npm start
  • Then navigate to http://localhost:300x
  • Node: In Windows system you need to install win-node-env, because setting NODE_ENV=production before command babel doesn't work on Windows. Here's the packages https://www.npmjs.com/package/win-node-env


Build Static HTML

Run the following commands:

npm run build
                        

Then

 npm run export
                        

Now you can see the exported HTML content on a directory called out inside your project. That's a fully functioning static web app. You can deploy it to any static hosting service, and it will work fine. But before we do that, we need to test it out locally. In order to test the app, install the following serve NPM module globally:

npm install -g serve
                        

After you've installed serve, run following commands from /out directory

serve -p 8080
                        

Now you can access your static app in http://localhost:8080. Everything should be working as usual.

Deployment


Deploy to server

  • First you have to clone/copy the project in your hosting/cloud server.
  • If you haven't install the dependencies before, please run npm install
  • Then run npm run build
  • Run app in background process

    To run it in background you may try PM2 pm2.keymetrics.io and https://www.npmjs.com/package/pm2. PM2 is a daemon process manager that will help you manage and keep your application online 24/7

    • Install the pm2 globally
      npm install pm2@latest -g
    • Go to project folder
    • Create ecosystem file
      pm2 ecosystem
      It will generate ecosystem.config.js in your root project
    • Open ecosystem.config.js. Then Change the script target to ./index.js like this:
                                        
      module.exports = {
        apps : [{
          name      : 'luxi-react', // Your project name
          script    : './index.js', // Change the script target to ./index.js
          env: {
            NODE_ENV: 'development'
          },
          env_production : {
            NODE_ENV: 'production'
          }
        }],
      
        deploy : {
          production : {
            user : 'node',
            host : '212.83.163.1',
            ref  : 'origin/master',
            repo : 'git@github.com:repo.git',
            path : '/var/www/production',
            'post-deploy' : 'npm install && pm2 reload ecosystem.config.js --env production'
          }
        }
      };
                                        
                                      
    • Run the project
      pm2 start ecosystem.config.js --env production
    • Then navigate to http://localhost:3001


Deploy to NOW

Deploy your website quickly, without having to manually configure DNS, SSL, CDN or hosting. Integrate with your favorite tools, and bring your entire team of developers and designers closer together.

  • Go to your projects, then npm run now-build. The static HTML will be generated in dist/ folder
  • Next just run now --prod to delploy.
  • Wait until process finish. Once finish you will get live url yo access it.

Troublehooting


Here's most common error problem when installation and first setup project

  • if got warning like this :
    
    npm WARN slick-carousel@1.8.1 requires a peer of jquery@>=1.8.0 but none is installed. You must install peer dependencies yourself.
            
    Don't worry the app will run as well

    For warning some of dependencies need another dependencies too, maybe once you install them, there’s some changes from the 3rd party vendor so probably it will make a warning to another dependencies.

  • if got an error with a dependencies installation. Try to remove the all module node_modules/. Then install again with npm install. If error still happen, please try to remove the problematic package node_modules/ foler. After that try to install the problematic package manually. npm install ‹package_name› --save-dev
  • if still got an error. Try to update the problematic package instead.
  • If you get error messages when start project npm start like this
    ERROR in ./app/styles/layout/base.scss (./node_modules/css-loader/dist/cjs.js??ref--8-1!./node_modules/postcss-loader/src??ref--8-2!./node_modules/sass-loader/lib/loader.js??ref--8-3!./app/styles/layout/base.scss)
    Module build failed (from ./node_modules/sass-loader/lib/loader.js):
            
  • It mean the node-sass not installed succesfully. May because connection problem, changed node environment during installation, or blocked node-sass repository
  • Please install node-sass manually by npm install node-sass --save
  • Build dll libraries npm run build:dll
  • Try to start project again npm start
  • Once build finish you may get warning getInitialProps.
    Warning: You have opted-out of Automatic Prerendering due to `getInitialProps` in `pages/_app`.
    Read more: https://err.sh/next.js/opt-out-automatic-prerendering
            
  • It because this template use next.js eith custom _app. So just ignore this, that's Next.js telling you that all your pages will have SSR.
  • You will get this warning message if not use HTTPS
    A cookie associated with a resource at http://doubleclick.net/ was set with `SameSite=None` but without `Secure`. A future release of Chrome will only deliver cookies marked `SameSite=None` if they are also marked `Secure`. You can review cookies in developer tools under Application>Storage>Cookies and see more details at https://www.chromestatus.com/feature/5633521622188032.
            
    Here's the guide to setup HTTPS with NextJS:
  • Development: Every changes the code will show warning messages.
    
    Warning: Can't perform a React state update on an unmounted component. This is a no-op, but it indicates a memory leak in your application. To fix, cancel all subscriptions and asynchronous tasks in a useEffect cleanup function.
            
    It because window scrolling function with HMR. This message will show in development only, you can ignore it by reload the browser.


Basic Code Structure


Folder structure

project-theme                                                                            
│   ├───components                                                                          
│   ├───pages                                                                               
│   ├───static                                                                              
│   │   ├───favicons                                                                        
│   │   ├───images                                                                          
│   │   ├───locales                                                                       
│   │   └───text                                                                            
│   ├───theme                                                                               
│   └───vendors                                                                             
                        

Code preview


Landing Page

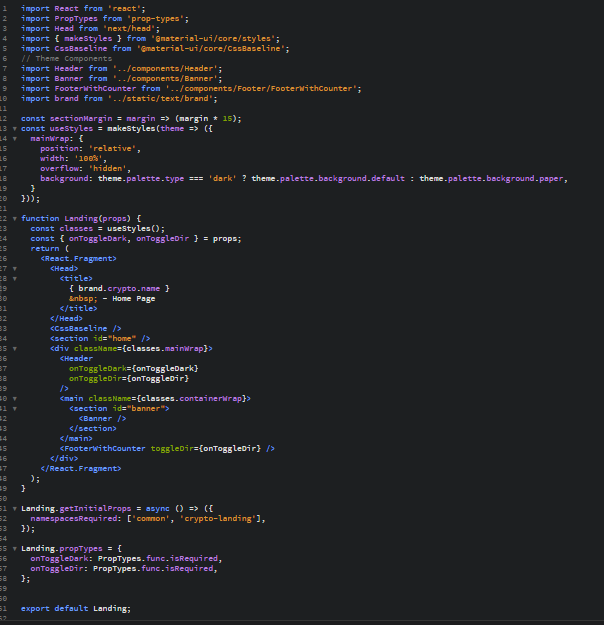
Landing page structure /pages/index.js

code

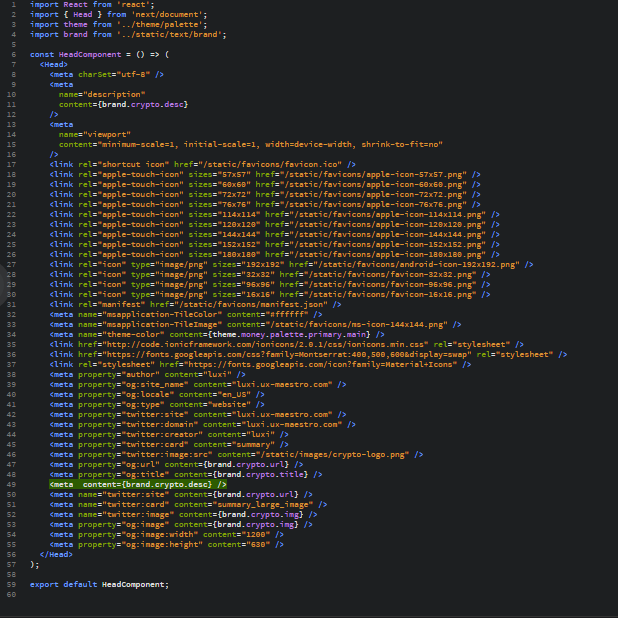
Header

You can put google analytics, font icon, embeded fonts, etc here. /components/header.js

code2

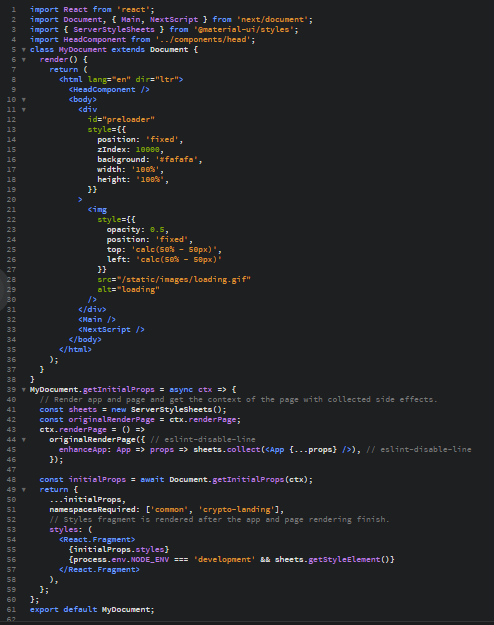
Document body

/pages/_document.js

code2


Directory Alias

This template use babel-plugin-root-import. So you can call any components or images from root project easly.

Name Alias Directory Sample Use
UI Components ~/components /components import Header from '~/components/Header';
Images ~/static/images static/images import imgAPI from '~/static/images/imgAPI';
Dummy text and link ~/static/text static/text import brand from '~/static/text/brand';
Component Style Overider ~/vendors /vendors import '~/vendors/slick/slick-theme.css';
And any your files ~/yourfolder /yourfolder import '~/yourfolder/file';

UI and Languages


Follow this guide bellow to modify user interface, branding identity and default language.

Create New Page


  • For example we want to create an "About" page, you need to create to 2 files pages/about.js and pages/[locale]/about.js.
  • // pages/about.js
    // Use for redirection by following language param [locale]. It will redirect to pages/[locale]/about.js
    
    import { Redirect } from '../lib/redirect';
    export default Redirect;
                                  
                                                                
    // pages/[locale]/about.js
    // It's a real page containing translations or components with translations
    
    import React from 'react';
    import { useTranslation } from 'next-i18next';
    import { getStaticPaths, makeStaticProps } from '../../lib/getStatic';                                
    
    export default function About() {
      const { t } = useTranslation('common');
      return (
        <div>
          <p>This is the about page</p>
          <p>{t('title')}</p>
        </div>
      );
    }
    
    const getStaticProps = makeStaticProps(['common']);
    export { getStaticPaths, getStaticProps };
                                  
  • Then we can access that page with http://localhost:3000/about or http://localhost:3000/en/about


Create New Component


  • Go to /components/
  • Create new folder ex: MyComponent. The name must in capitalize
  • Create new js file inside that folder MyComponent, ex SampleComponent.js. The name must in capitalize
  • Inside the file create a simple ES6 Class ex:
    // file: /components/MyComponent/SampleComponent.js
    
    import React from 'react';
    
    function SampleComponent(){
        return (
          <H1>Hello World</H1>
        );
      }
    }
    
    export default SampleComponent;
    
    
  • Open a target page where you want use it. Ex: Open /pages/about.js. (Example page that we've made in previous section)
  • Import component form component library
    import SampleComponent from '~/components/MyComponent/SampleComponent.js'
  • Then use it inside render function
    render() {
      return (
        <SampleComponent />
      );
    }
                                
  • Here's complete code
    // file: app/containers/MyPage/SamplePage.js
    import React from 'react';
    import Head from 'next/head';
    import SampleComponent from '~/components/MyComponent/SampleComponent.js'
    
    export default function About() {
      return (
        <div>
          <Head>
            <title>
              { brand.crypto.name }
              &nbsp; - Blank page
            </title>
          </Head>
          <SampleComponent />
        </div>
      );
    }
    
    export default About;
    
    
  • Then you can check the result at http://localhost:3000/about

Clean Code with Eslint


Eslint is disabled by default. You can enable it to keep your code consistent and avoiding bug.
NOTE: By enable eslint the running app process at beginning will slower.

Just follow this step to enable eslint
  • Go to /next.config.js
  • Just uncomment this code bellow
    const withCSS = require('@zeit/next-css')
    const withImages = require('next-images');
    
    module.exports = withImages(
      withCSS({
        publicRuntimeConfig: {
          localeSubpaths: typeof process.env.LOCALE_SUBPATHS === 'string'
            ? process.env.LOCALE_SUBPATHS
            : 'none',
        },
        webpack: (config, options) => {
          cssModules: true,
          //      config.module.rules.push({
          //          enforce: 'pre',
          //          test: /\.js?$/,
          //          exclude: [/node_modules/],
          //          loader: 'eslint-loader',
          //          options: {
          //            quiet: true,
          //          }
          //      });
          config.node = {
            fs: 'empty'
          }
          return config;
        },
      })
    );
  • Then should become like this
    const withCSS = require('@zeit/next-css')
    const withImages = require('next-images');
    
    module.exports = withImages(
      withCSS({
        publicRuntimeConfig: {
          localeSubpaths: typeof process.env.LOCALE_SUBPATHS === 'string'
            ? process.env.LOCALE_SUBPATHS
            : 'none',
        },
        webpack: (config, options) => {
          cssModules: true,
          config.module.rules.push({
             enforce: 'pre',
             test: /\.js?$/,
             exclude: [/node_modules/],
             loader: 'eslint-loader',
             options: {
               quiet: true,
             }
          });
          config.node = {
            fs: 'empty'
          }
          return config;
        },
      })
    );
    
  • Run the project npm run dev.
    You will be notified with an error message if your code not clean or consistent. ESLint itself is a tool for identifying and reporting on patterns found in ECMAScript/JavaScript code, with the goal of making code more consistent and avoiding bugs.
    More about elint https://eslint.org/docs/user-guide/getting-started

External Reference

Here's some external reference of library that we used


Icons Used


To use icon, it has two method

Material Font Icons

  • Please make sure Google Material Icons already embeded in components/head.js.
    If not just embed this inside head tag
    <head>
          <link href="https://fonts.googleapis.com/icon?family=Material+Icons" rel="stylesheet" />
    </head>
  • Connect to internet
  • Import Material UI Icon to your component
    import Icon from '@material-ui/core/Icon';
  • Then add it inside render method. Example for use access_time icon
    <Icon>access_time<Icon />


Material SVG Icons

It's interesting to have the building blocks needed to implement custom icons. This template use NPM package, @material-ui/icons, that includes the 900+ official Material icons converted to SvgIcon components.

  • Import all necessary icons form Material UI Icons library
    import AccessTime from '@material-ui/icons/AccessTime';
    import Adjust from '@material-ui/icons/Adjust';
    import BatteryStd from '@material-ui/icons/BatteryStd';
                                
  • Use them as component in render method
     render() {
      return (
        <div>
          <AccessTime />
          <Adjust />
          <BatteryStd />
        <div />
      );
    }
                                

Or from original source Google Material Icons


IonIcons Font

  • Please make sure IonIcons already embeded in components/head.js.
    If not just embed this inside head tag
    <head>
        <link href="http://code.ionicframework.com/ionicons/2.0.1/css/ionicons.min.css" rel="stylesheet" />
    </head>
  • Connect to internet
  • The sample usage
    
    <span className="ion-ios-world-outline" />  
                              
  • Here's the ionicons cheatsheet https://ionicons.com/v2/cheatsheet.html


  • Sources and Credit


    Fonts :
    Lato

    Preview Images Used
    Unsplash
    Pixabay
    randomuser.me

    Note: All images are just used for Preview Purpose Only. They are not part of the template and NOT included in the final purchase files.


    Credits
    Name Repository License
    @babel.js https://github.com/babel/babel MIT
    @material-ui https://github.com/mui-org/material-ui MIT
    clsx https://www.npmjs.com/package/clsx MIT
    express https://github.com/expressjs/express MIT
    jss-rtl https://github.com/alitaheri/jss-rtl MIT
    material-ui-pickers https://github.com/dmtrKovalenko/material-ui-pickers MIT
    next.js https://nextjs.org/ MIT
    next-i18next https://www.npmjs.com/package/next-i18next MIT
    react https://github.com/facebook/react MIT
    react-countup https://github.com/glennreyes/react-countup MIT
    react-google-maps https://github.com/tomchentw/react-google-maps MIT
    react-loading-bar https://github.com/mironov/react-redux-loading-bar MIT
    react-material-ui-form-validator https://www.npmjs.com/package/react-material-ui-form-validator MIT
    react-slick https://github.com/akiran/react-slick MIT
    react-youtube https://www.npmjs.com/package/react-youtube MIT
    redux-form https://github.com/erikras/redux-form-material-ui MIT
    webpack https://github.com/webpack/webpack MIT